
In the realm of food manufacturing, ensuring the safety and quality of products is paramount. A critical aspect of achieving this goal is the implementation of effective hygiene station steps. These steps act as crucial checkpoints along the production process, safeguarding against contamination and upholding the highest standards of cleanliness. In this blog, we will delve into the core hygiene station steps for food manufacturing and their significance in maintaining the integrity of the final products.

Learn more about hygienic zoning in our Hygiene Zone Ebook - Download it here!
In this video, we dive into the essential 5 steps that individuals must follow as they navigate through the core hygiene zone at a food manufacturing facility. We provide detailed instructions for each step to ensure a thorough understanding of the process.
Hygiene Station Step 1. Footwear Donning & Sanitation
 Footwear can inadvertently track contaminants into sensitive areas. Establishing footwear sanitation stations at designated entry points is essential. These stations may consist of foot baths or shoe-cleaning equipment that remove dirt and disinfect the soles of shoes. Employees entering production zones must step through these stations to ensure that footwear is free from potential contaminants.
At the first step, team members are advised to put on the suitable plant footwear, which may include plant shoes or plant boots. Once they have worn the appropriate footwear, they should proceed to sanitize it before entering the hygiene zone.
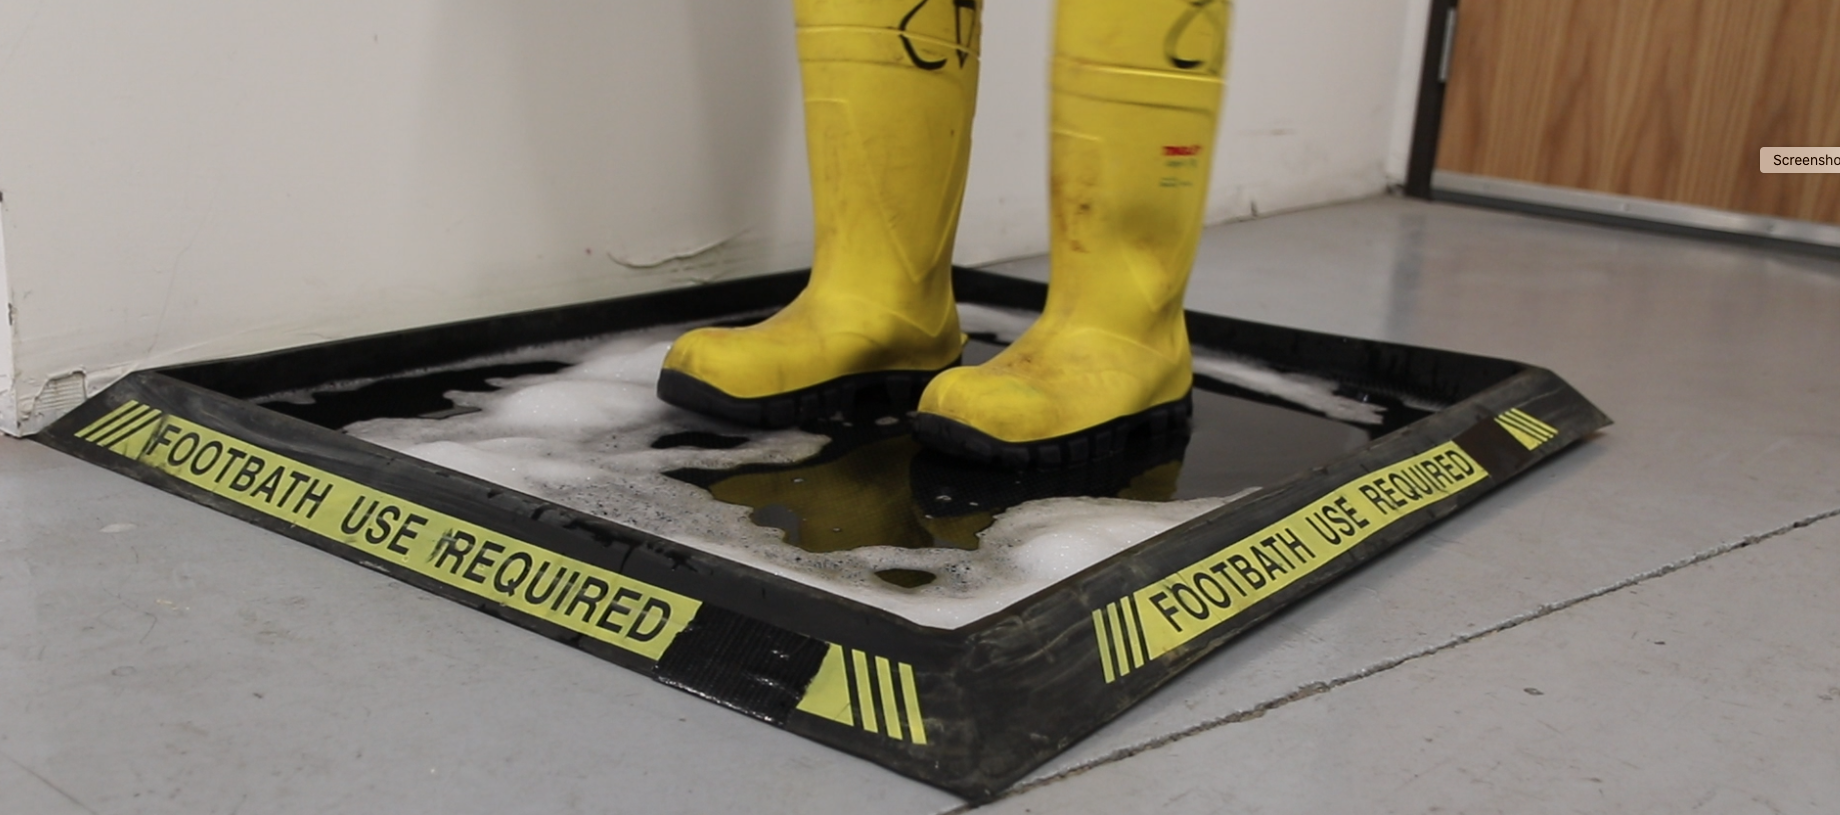
During the process of sanitizing footwear, it is crucial to ensure that team members completely immerse their feet in the sanitizing solution and maintain contact for at least one second.
Furthermore, if it is relevant to your particular facility and you are not swapping into plant shoes or boots, it would be advisable to don shoe covers before entering the hygiene zone. We strongly advise sanitizing your footwear before donning these shoe covers, as they primarily safeguard against dirt and debris rather than pathogens.
Learn more about footwear hygiene best practices in our Footwear Hygiene resources
Hygiene Station Step 2. Donning Frocks or Smocks
Employees are advised to put on their frock, smock, and sleeve covers, ensuring that all sleeves are fully extended to the wrist and all buttons are securely fastened.
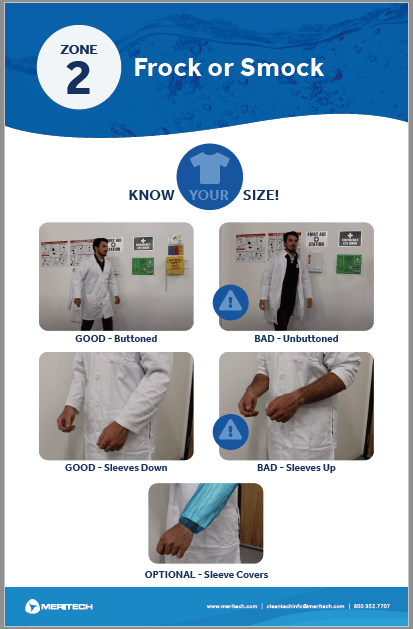 In the second step, team members should put on their frock or smock and, if necessary, sleeve covers. As they enter the hygiene zone, it is crucial that team members choose the appropriate size and ensure their frock or smock is clean and free from any dirt or damage. The sleeves should be pulled down completely on both arms, and all buttons or ties need to be securely fastened, ensuring they do not touch the floor. While donning the frock or smock, team members must pay attention to the buttons, making sure they are intact and not loose, as any loose buttons could potentially contaminate the food products.
If there is a need at the facility, team members should consider wearing sleeve covers to safeguard their frocks from any potential damage caused by excessive soils or water. These covers should be worn from the wrist and extend all the way up the forearm.
Download Hygiene Posters like the one seen here to help
guide your team through the hygiene zone.
Hygiene Station Step 3. Personal Protective Equipment
The use of appropriate personal protective equipment (PPE) is paramount to prevent the spread of contaminants from personnel to the food products. Depending on the specific production area and tasks, PPE may include gloves, hairnets, beard covers, aprons, and safety goggles. It's essential that employees are trained in the correct donning and doffing procedures for their PPE to ensure its effectiveness.
The third step in the process is focused on the proper application of personal protective equipment (PPE). This includes the use of hearing protection, beard nets, masks if needed, hairnets, and safety glasses. These essential items are necessary to ensure the safety and hygiene of team members while working in the core hygiene zone.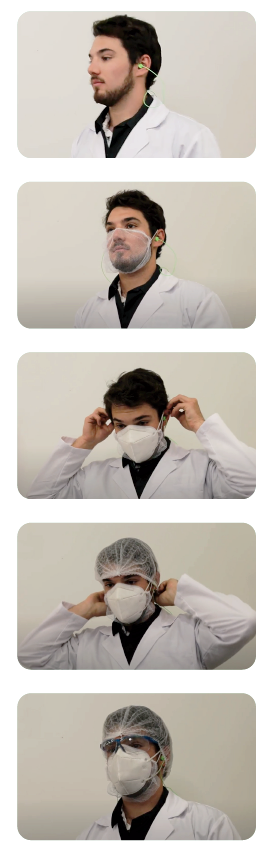 To begin the personal protective equipment (PPE) phase, team members should prioritize donning hearing protection. With a multitude of options available, it is crucial to ensure that the chosen hearing protection meets the company's standards for the specific tasks performed by team members.
Once team members have finished putting on their hearing protection, they should consider wearing a beard net if needed. It is crucial to ensure that the beard net fully covers all facial hair and the nose to maintain proper hygiene.
If team members find it necessary, they should proceed to wear a mask. It is crucial for individuals to ensure that all the strings from the mask and/or the beard net are positioned behind or over their ears for proper fitting and hygiene.
The next essential piece of personal protective equipment (PPE) to be worn is the hairnet. It is crucial for team members to carefully open the hairnet and ensure that all of their hair is securely tucked inside, both on the sides and at the back of their head. Additionally, it is important to cover the ears to ensure that the strings from the mask and beard net are also covered and maintain proper hygiene.
As the final step in the hygiene zone process, team members should don eye protection. It is essential that the eye protection fits securely and snugly on the head, with the ear pieces placed underneath the hair net. This ensures optimal protection and hygiene for all individuals in the core hygiene zone.
Hygiene Station Step 4. Manual or Automated Handwashing
The foundation of any effective hygiene station is proper hand hygiene. All personnel involved in the food manufacturing process must adhere to strict handwashing protocols before entering production areas.
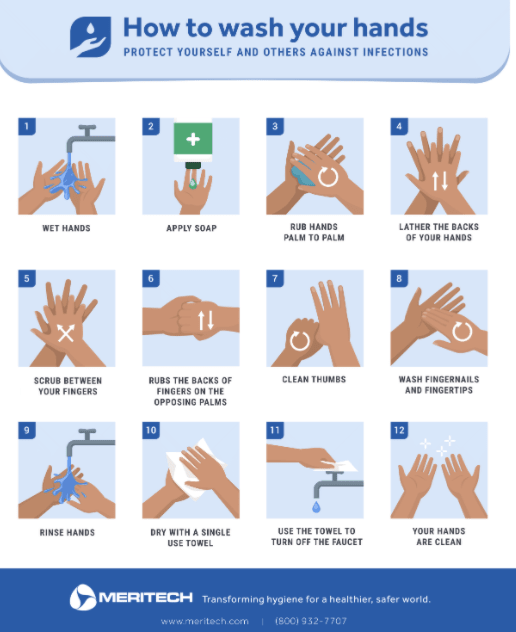
Step four focuses on the crucial aspect of hand hygiene, which is paramount for food safety within the hygiene zone. Individuals have the choice between two handwashing options: manual or fully automated. Hand-washing is an essential step that cannot be overlooked.
Manual hand washing involves following a 12-step process that should be completed within 20 seconds, which is roughly the time it takes to sing "Happy Birthday" twice.
This 12 step procedure poster is free to download here.
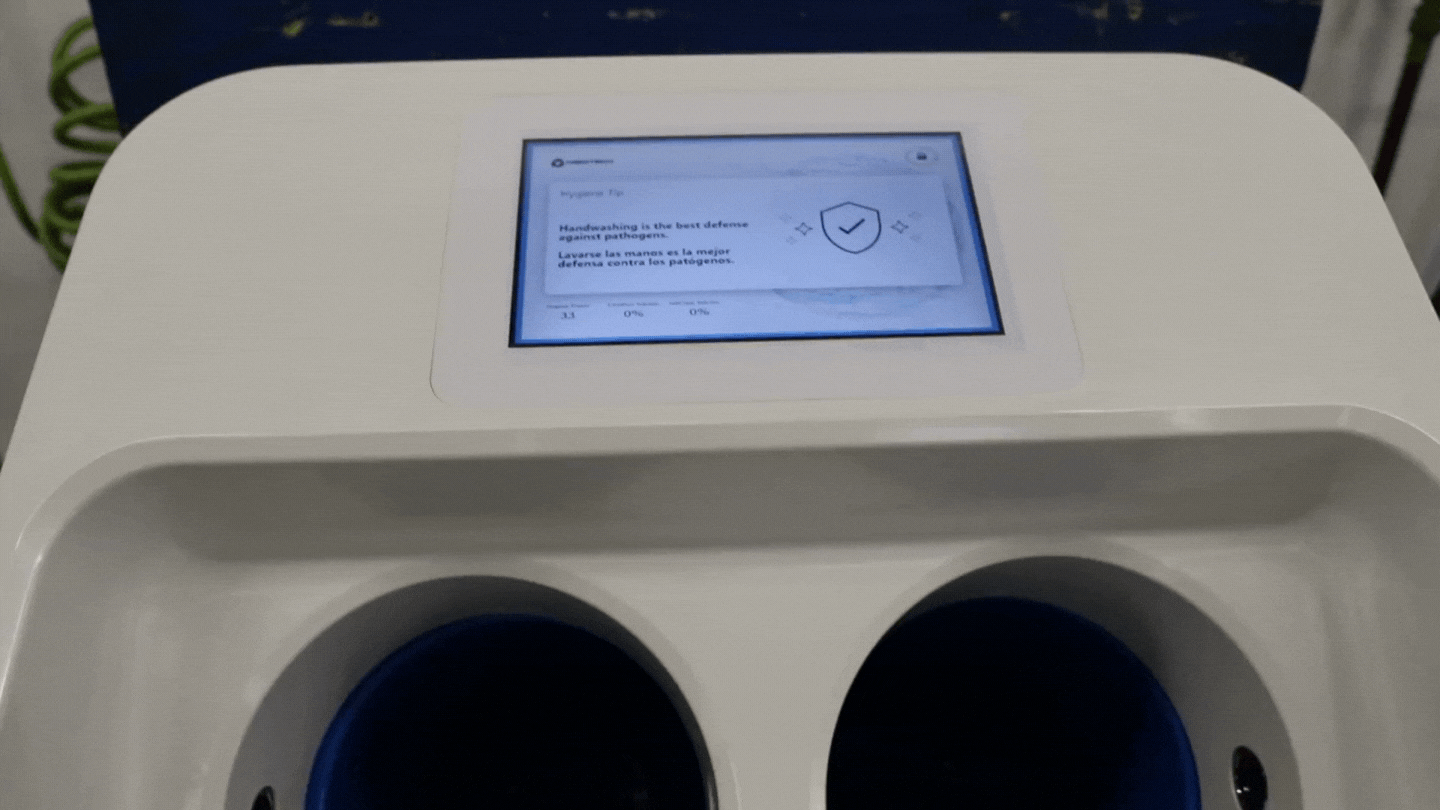
The fully automated hand-washing process is incredibly convenient and effective. With the CleanTech® Automated Handwashing Station, employees simply approach the station and within 12 seconds, their hands are thoroughly washed, sanitized, and rinsed. This efficient and effective system ensures consistent quality control for hand hygiene, benefiting every user in the hygiene zone.
5. Hand Drying
As we reach step five, the culmination of the hygiene zone processes, we come to the important task of drying the hands. There are two options for hand drying: an efficient air dryer or a trusty paper towel. While both have their merits, we highly recommend using a paper towel as it reduces the likelihood of cross-contamination on the hands. Take a moment to consider the best method for your facility and ensure that proper hand drying is prioritized in maintaining a hygienic environment.
Check out our post "Hand Drying Methods Compared" for more information!
Food manufacturing is a delicate dance that requires unwavering commitment to safety and quality. The core hygiene station steps discussed in this blog play a pivotal role in upholding these standards. By ensuring that personnel adhere to rigorous handwashing protocols, use appropriate PPE, and maintain clean footwear manufacturers can significantly reduce the risk of contamination and protect consumers from potential health hazards.
Ultimately, the successful implementation of these core hygiene station steps reflects a company's dedication to product integrity, consumer safety, and industry excellence. As the food manufacturing landscape continues to evolve, these steps remain a cornerstone of responsible and ethical production practices.
Schedule a Hygiene Station Design Consultation with one of our experts!